 TEAM SOLUTIONS
 WORKFLOW SOLUTIONS


 REVIEW TOOL
 PROJECT MANAGEMENT
 TOOLS & INTEGRATIONS
 CLIENT INTERVIEWS


")
Post is also avalible in:
![]()
![]()
![]()
Last updated: May 2026
Online proofing tools are different: pricing, features, and service. And today, we’re going to look into one of the most asked about.
If you read our blog or had a chance to contact the Approval Studio team, you know that we like talking to our users or potential users, asking all kinds of questions about their experience in reviewing graphic files. One of these questions is regarding our competitors, and one of the first names we hear pretty often is GoVisually. Considering we have a series of articles dedicated to competitors (check out Review Studio, QuickReviewer, and Pageproof comparison), it was only logical to create one for GoVisually as well. And as an addition, there will also be a GoVisually comparison with a worthy competitor: Approval Studio.
You know the gist, I’m not a neutral party; however, a lot of what you’ll see here today will be based on real reviews from across the internet. This way, we’ll make sure that our article is as thorough and as unbiased as possible. We’ll discuss GoVisually pricing, features (AI as well), and which teams will benefit from it most. So, let’s not waste any time!
What is GoVisually?
GoVisually is a cloud-based creative online review tool designed to replace email-based feedback. Teams upload design assets, invite reviewers via a shareable link, and collect annotations directly on the file, no account required for reviewers.
I don’t know about you, but to my ear, the phrase “we’re based in beautiful Sydney, Australia” sounds somewhat enchanting. I wish I could go there someday, meet with the team behind GoVisually, and talk about the cool project they launched in 2011. Our Australian competitors earned themselves a good reputation with the hard work they put in.
With an almost perfect score and hundreds of reviews waiting for you to read them, it becomes clear that they are working great for some teams. Let’s look at the features and see what exactly it is that makes them stand out.

GoVisually features
As a tradition we started in our Ziflow comparison article, I will review GoVisually features across three different dimensions that are all important for the online proofing process: review & proofing, version management, and integrations. We’ll go through each, with an objective list of features and a more subjective score from me.
Review & Proofing
That’s what we’re here for, right? Online proofing that doesn’t feel like a constant headache. Well, in that case, here are the features you will get:
- One-click Approve / Request Changes / Reject workflow for fast decision-making
- Advanced time-coded commenting for video review
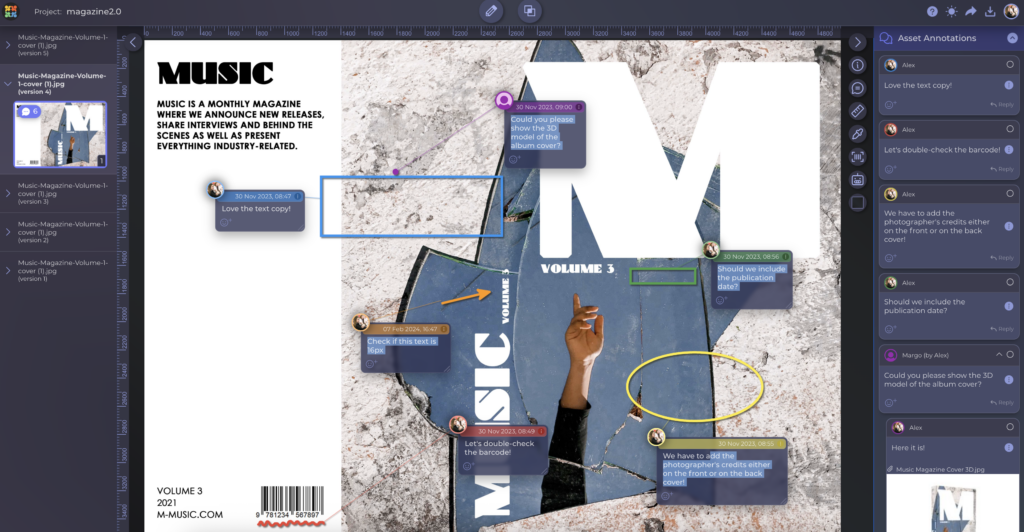
- 3 different on-screen annotation tools: comment, box&comment, arrow & comment
- Unlimited guest reviewers with no registration. Access is given via a link
- Discussions are organized into threads, tagged mentions, and file attachments in the comments are available.
- Comments are organized into private and team ones
- Checklists available
Honest review: I really like the review and proofing in GoVisually. Sure, it doesn’t cover many features, but how GoVisually describes itself, “20% of features are doing 80% of your job”. It’s great for external reviewers, who just want to be done quickly, but it may be inconvenient in the long run for the team members. But who am I to judge if the users overwhelmingly report that it does its job well? So, I guess for me, it’s “80/20” out of ten.
Version Management
Unlike proofing, version control and management are something that we can get as a nice bonus to the approval process we came for. So, here are some of the GoVisually features that help with it:
- Real-time review status tracking (approved / changes requested / pending review) for clear project visibility
- Full version history with rollback to previous versions when needed
- Side-by-side version comparison to review revisions visually between uploads
- Overlay comparison mode that highlights subtle changes between versions for quick proofing checks
- Sections for a higher level of organization for each project
Honest review: GoVisually’s version management is clean and does its job. Genuinely great organization options, even if there aren’t “views” in a usual sense, the projects and sections are amazing for keeping everything in line. And the rollback feature can save you from a lot of trouble. Users also say that versions are easy to track and store. However, the project limit feels pretty weird to me, and some users. So, to me the score would be “interesting decision” out of 10.
Integrations
- Adobe Creative Cloud plugin
- 7000+ connectors via Zapier
- Slack
- Asana
Honest review: Great for a small team day-to-day. Adobe is always useful, and integrating with Asana makes up for some of the more advanced project management features missing. And of course, Zapier is the star of the show. “Only if there were also an API” out of 10.
GoVisually AI Features vs Approval Studio
So, AI is all around us. OpenAI only serves 2.5 billion queries per day, so chances are pretty high that you have used it to complete a task at work. Let’s start comparing Govisually with its alternative with AI features.
Both GoVisually and Approval Studio make it easier by allowing you to work in context with their AI features. However, both tools execute it differently.
GoVisually’s AI story is the Compliance AI Suite. It’s an add-on that automatically checks designs against label regulations (FDA, EU, and 20+ global frameworks), flagging allergens, nutrition claims, and other compliance-critical content. It’s powerful and focused, aimed squarely at CPG brands and regulated industries. However, it’s not part of the core product. It’s a premium add-on starting from $1,500/month annually.
Approval Studio’s AI takes a different angle. Firstly, there’s a built-in AI chat assistant that lives inside the review tool itself, letting reviewers proofread copy, paraphrase, or troubleshoot.
Secondly, Approval Studio has its native MCP server. MCP (Model Context Protocol) lets you connect Approval Studio directly to AI agents like Claude or ChatGPT, or wire it into automation platforms like n8n or Make. You can just tell the AI to do the manual work, like create a project, pull data from various sources, and trigger workflows instead of you. That’s a fundamentally different kind of AI integration: less about analyzing your files, more about putting AI to work across your entire creative pipeline.
GoVisually pricing
GoVisually uses per-user pricing, so cost scales directly with your team size. No free plan, but both tiers include a 14-day free trial with no credit card required. That’s simple enough, but here’s the thing: once you grow past a handful of people, the per-seat model adds up fast. That’s where Approval Studio’s flat-rate plans start to look interesting. So, without further ado, here’s a pricing breakdown, current as of May 2026.
| Feature | GoVisually Lite | GoVisually Pro | AS Lite | AS PRO | AS PRO XL |
|---|---|---|---|---|---|
| Price (per month) | $16/user | $33/user (min 3) | $60 | $160 | $300 |
| Users included | Up to 5 | Min 3 | 5 | 5 | 15 |
| Storage | 3 projects (Lite limit) | Unlimited projects | 5 GB | 5 GB | 30 GB |
| Video review | ✗ | ✓ | ✓ | ✓ | ✓ |
| Version comparison | ✓ | ✓ | ✓ (4 modes) | ✓ (4 modes) | ✓ (4 modes) |
| Free trial | 14 days | 14 days | 14 days | 14 days | 14 days |
| API access | ✗ | ✗ | ✗ | ✓ | ✓ |
GoVisually vs Approval Studio: full comparison table
Here’s a complete side-by-side comparison of every major feature as of 2026:
| Feature | Approval Studio | GoVisually | Winner |
|---|---|---|---|
| Entry price | $60/month (5 users, Lite) | $16/user/mo (Lite) | ✅ GoVisually for tiny teams; AS scales better |
| Free trial | Yes — 14 days | Yes — 14 days | 🤝 Tie |
| Artwork / packaging proofing | Native (colour separation, barcode reader) | Not natively supported | ✅ Approval Studio |
| Annotation tools | 5 shapes | 3 tools (comment, box+comment, arrow+comment) | ✅ Approval Studio |
| Manual compare modes | 4 modes: Side-by-Side, Fader, Difference, Toggle | 2 modes: Side-by-Side, Overlay | ✅ Approval Studio |
| Real-time collaboration | Yes — live chat, no refresh needed | Threads & comments (not live-synced) | ✅ Approval Studio |
| Built-in AI assistant | Yes — in-tool AI chat | No | ✅ Approval Studio |
| AI compliance checks | No (roadmap) | Yes — 20+ frameworks (add-on, from $1,500/mo) | ✅ GoVisually |
| MCP server / AI agent integration | Yes — Claude, n8n, Make, Zapier | No | ✅ Approval Studio |
| Barcode scanner | Yes — built-in | No | ✅ Approval Studio |
| Spellchecker | Yes — built-in | No | ✅ Approval Studio |
| Colour separation viewer | Yes — CMYK / spot colours | No | ✅ Approval Studio |
| Checklist | Yes | Yes | 🤝 Tie |
| Custom kanban dashboard | Yes | No | ✅ Approval Studio |
| Trigger-based workflows | Yes | No | ✅ Approval Studio |
| External reviewers (no account) | Yes — unlimited, via link | Yes — unlimited, via link | 🤝 Tie |
| Video proofing | Yes — time-coded comments | Yes — time-coded (Pro plan+) | 🤝 Tie |
| File formats | Images, PDF, AI/SVG, Office docs, video | PNG, JPG, PSD, GIF, MP4 (Pro+) | ✅ Approval Studio — broader support |
| Version management | Auto versioning, 4 compare modes, full timeline | Full history, side-by-side compare, rollback | ✅ Approval Studio |
| Digital Asset Library | Yes — PRO plan+ | No | ✅ Approval Studio |
| Adobe Creative Cloud | Yes — official extension | Yes — PS, AI, InDesign plugin | 🤝 Tie |
| Slack integration | Yes | Yes | 🤝 Tie |
| Shopify integration | Yes — native | No | ✅ Approval Studio |
| REST & GraphQL API | Yes — both | No public API (Zapier/webhooks only) | ✅ Approval Studio |
| Zapier integrations | 5,000+ apps | 7,000+ apps | ✅ GoVisually |
| Audit trail / timeline | Yes — full project timeline | Version history with timestamps | ✅ Approval Studio |
| Proof report (PDF export) | Yes | Yes | 🤝 Tie |
| G2 / Capterra rating | 4.9 / 4.8 | ~4.5 / 4.7 | ✅ Approval Studio |
Approval Studio features
So now that we know what GoVisually is missing. As an alternative to GoVisually, Approval Studio fills some of the gaps. Here’s what Approval Studio brings to the table across the same three categories:
Review & Proofing
What Approval Studio is doing well as a GoVisually competitor is widening the review & proofing features, while keeping the UI understandable for clients:
- Intuitive UI with clearly visible Approve / Reject buttons
- Five annotation shapes: comment, highlight, box, arrow, and spot
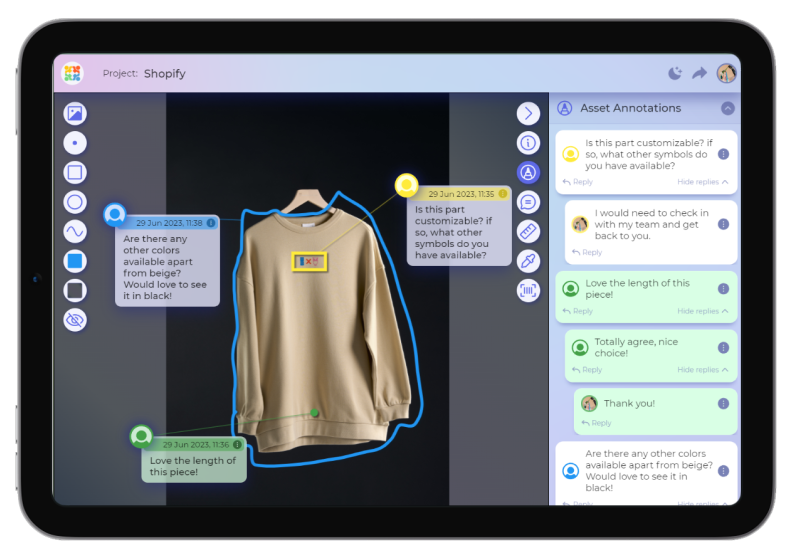
- Real-time chat built directly into the review tool
- Trigger-based workflows for automated routing
- Customizable kanban board alongside list and table views
- Built-in spellchecker, barcode reader, color separation viewer, ruler, and AI assistant
- External reviewers still join via a link with no account needed
Version Management
GoVisually tracks versions well enough, but Approval Studio makes version management feel like a feature rather than an afterthought:
- Digital Asset Library (DAL): one central place to store and reuse all your assets
- Four compare modes: Side-by-Side, Fader, Difference, and Toggle
- Full project Timeline: every upload, comment, approval, and rejection is logged
- Proof report: a full exportable record for any asset across all its versions on top of the project report
- Automated file versioning uploads a new file, and versioning happens without any extra steps
- “Share only the latest version” option so external reviewers don’t get confused
Integrations
GoVisually relies on Zapier for almost everything outside its core. Approval Studio has a similar set of integrations but with wider support for proofing, project management, and industry-specific issues:
- Shopify integration for e-commerce creative approval workflows
- Adobe Creative Cloud (official extension)
- Slack
- Zapier (5,000+ apps)
- REST and GraphQL APIs for custom integrations
- MCP server for n8n, Make, or AI-agent integration
Choose the right tool for you
Now is the moment of truth: who should choose which tool? I have looked into each and created a list of personas who would benefit from using GoVisually and who should choose its alternative, Approval Studio.
Is GoVisually the right proofing tool for my team?
Your team is small (or there’s only you), and you need a fast, no-fuss proofing tool right now. GoVisually’s $16/user/month entry price, zero learning curve, and no-signup guest reviews make it the easiest way to get client feedback. For a simple workflow (upload, share a link, get comments, approve) and a tiny team, GoVisually is hard to beat.
Your work is purely digital creative: ads, social graphics, marketing videos. GoVisually is purpose-built for this. A convenient video and file proofing works amazingly for such teams. On top of that, an Adobe Integration is a great plus.
You need AI-driven compliance checks for regulated labeling. GoVisually’s Compliance AI Suite covers FDA, EU, and 20+ frameworks. For packaging teams, this is a lifesaver. And if that’s a core workflow need, it’s worth the add-on cost.
When should I use Approval Studio instead of GoVisually?
First and foremost, you should choose Approval Studio if you need an affordable online proofing tool that can do almost everything GoVisually does and then some. As you’ve seen in the table above, the feature list tilts in Approval Studio’s favor across most categories.
Your team is big. As you might have seen in the pricing table, you start saving money with a 4-person team on Lite and a 10-person team on the PRO XL plan. Additionally, with the PRO/PRO XL plan, you get most of the project management features that are not available in GoVisually.
You have (or plan to have) a Shopify store. Approval Studio’s native Shopify integration lets you process design approvals directly from your store, working with assets your clients upload without leaving the Shopify ecosystem. A big advantage for e-commerce brands.
You’re proofing packaging, print, or any regulated content. The built-in color separation viewer, barcode reader, and spellchecker are purpose-built for these workflows. While GoVisually doesn’t have them natively.
You want AI working inside your design review process, not just checking files. Approval Studio’s MCP server lets you connect AI agents to your creative pipeline, delegating project creation, data pulls, and workflow triggers to AI instead of doing it manually. If your team is moving toward automation, this is the more future-proof bet.
Final thoughts
We have discussed two worthy competitors today, and they both work for different purposes. You, as a potential user, should choose wisely which one to use to make sure the tool doesn’t stall your process. The good thing is that you do have a choice. Both tools have free trials, and you can try both yourself to understand which fits your team best. And if you want to try workflow automation (another level to be honest), book a demo to get an overview of the system for your exact use case and a 14-day free trial of the PRO version.
Cheers!
