 TEAM SOLUTIONS
 WORKFLOW SOLUTIONS


 REVIEW TOOL
 PROJECT MANAGEMENT
 TOOLS & INTEGRATIONS
 CLIENT INTERVIEWS


Today’s world is about tailoring as many services as possible to your needs. Now, you can fully customize your life, completely controlling the colours and images surrounding you. Even Approval Studio has a wide range of customizable elements that can change the interface completely. This is a way for many to express their personality inconspicuously without being too obnoxious. This is how custom accessories, home decor, clothes, etc., are born and get into people’s lives. The industry responsible for such items is the Print On Demand or POD industry.
More About Print on Demand
What Are the Advantages?
A 2020 study suggested that the POD industry will only grow by 25.8% every year in the upcoming years as the demand for custom-made designs is unstoppable. I, myself, own a few T-shirts with exquisite designs that will make your jaw drop. This fact stops neither me nor millions of people from wanting to get even more of all kinds of questionable designs on their personal belongings.

Shopify is the primary marketplace for these works of art, which is exceptionally convenient for smaller businesses. It allows them to focus on the products rather than the administrative side. And believe me, creating custom designs is a challenging task as it is.
What Are the Downsides?
You see, as in every part of the design industry, POD is highly customer-centered. The customer is always right, especially when it comes to the goods that they get to create themselves and customize. A Taylor Swift fan will get crazy if they don’t get the correct shade of marron for their new custom album-themed bed linen. And nobody wants an angry customer who is not satisfied with the level of the details. For that, each POD seller has to pay an immaculate amount of attention to each component of a cap, phone case, blanket, pillow, etc.
Now, imagine you have tens of such designs, which one person must coordinate in most cases. The seller has to communicate with clients about payment, design approval, and shipment. It becomes a great hustle to keep everything in stride. In despair, people start browsing through some apps that will help with their problems. Luckily, there is something on the Shopify App Store that can help.
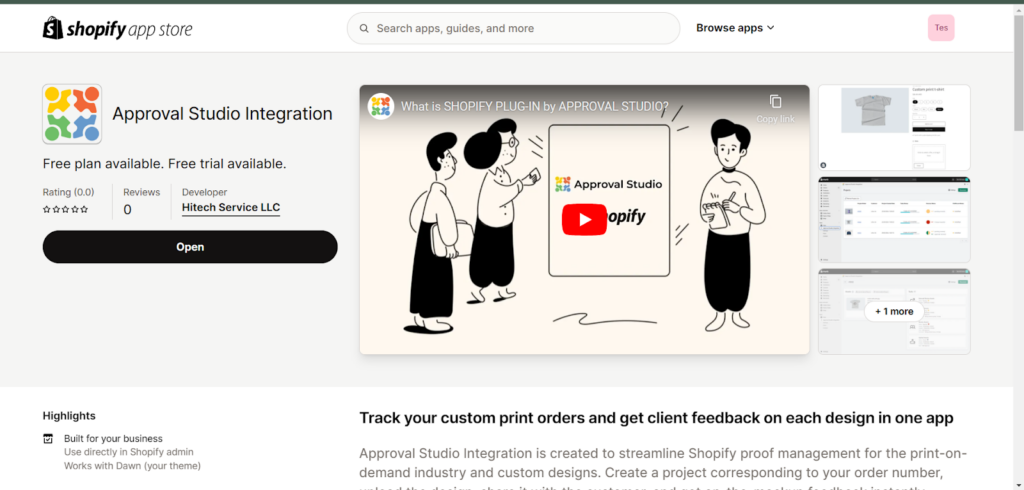
Approval Studio is an app that automates your Shopify store’s workflow. It allows you to transfer orders directly from Shopify, upload designs, create links for customers to annotate and give feedback on the design without registering, and so much more. Forget about the millions of steps and software required to finish a single project. Instead, turn to Approval Studio integration, which takes your hand and leads you through the whole process.
More About Approval Studio’s Integration
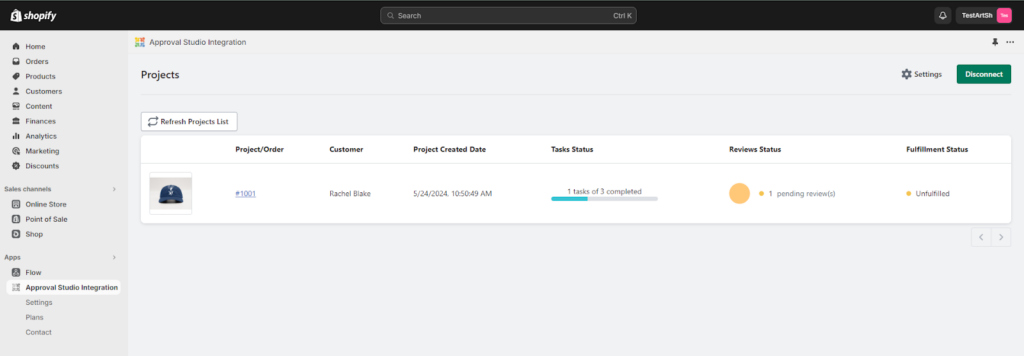
The intended workflow is that the customer orders a specific thing from your shop and pays for it. This action triggers the process of the order becoming a project in Approval Studio and following steps. Then, you can access the project either from the Shopify admin panel or the Dashboard inside Approval Studio. And just like that, the process starts: uploading a mock-up, receiving feedback, tracking progress, etc. However, as they say, no pain, no gain, and for your workflow to be this effortless, you need to get through some challenging steps. Don’t worry, though; I will lead and help you set up a workflow that will help you get rid of the mundane and focus on the creative.
Setting Up the Integration
Imagine that you have just started a POD shop on Shopify and want to automate your workflow using Approval Studio. The very first step in this treacherous journey is connecting your existing store to the integrations. However, it is a relatively easy one.
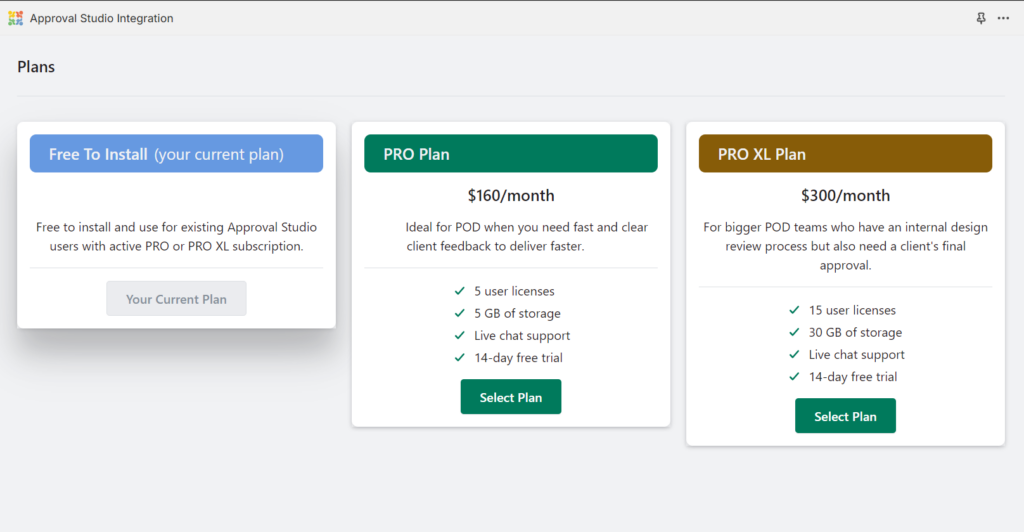
All you need to do is find Approval Studio in the Shopify Appstore and connect an account! After clicking install and giving permissions, you will be able to log in to your Approval Studio account. Don’t have one? Don’t worry; you will be redirected to the subscription page. However, be aware that Shopify integration is a part of our Pro and ProXL subscriptions. They both have a trial period, so you can test the system to get a hang of it and understand if it is for you. And voila, you are all set up!
Basic Settings
Now that you are all set up, it is time to go to settings and set up the automation. As mentioned before, this integration’s best feature is the automation of all project steps along with an accessible task view and tagging, depending on its current state. However, it is possible to customize what will trigger a particular action to make everything move smoother and faster as it should in the Print-on-demand industry.
The first thing you see are the basic configurations of Approval Studio’s account. There, you can choose which of the tenants, if there are many, will see the project on their Dashboard. Also, you can select the Project Owner—a particular user responsible for assigning tasks and leading the project. However, this setting can be turned off, possibly with a manual project owner assignment. Among other things, you can configure certain templates used for the projects and display customer info.
Trigger Settings
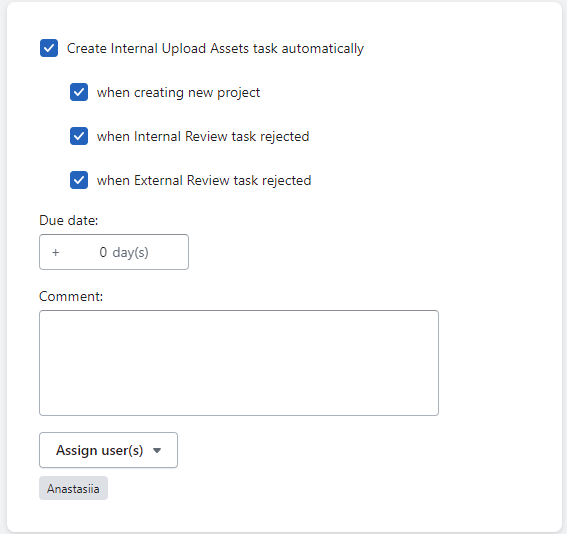
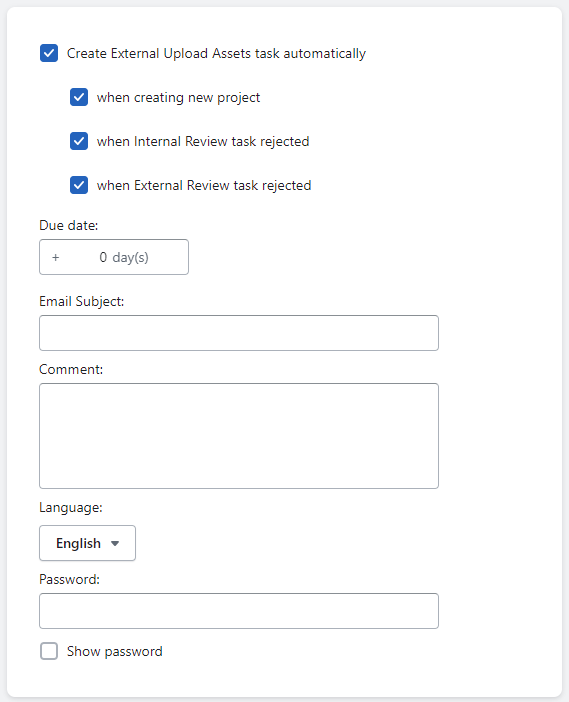
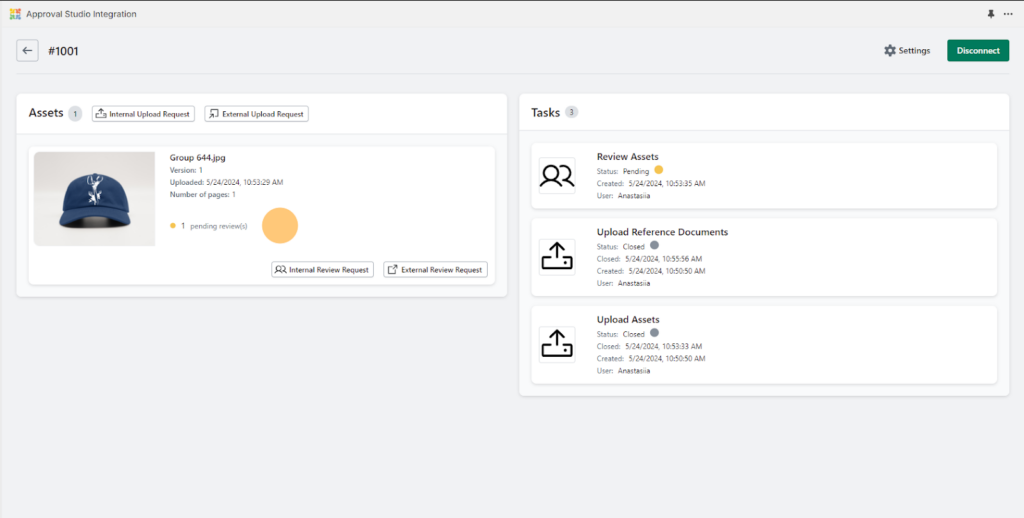
Having scrolled through all these, you can finally get to trigger settings and customize, in which case such tasks as Internal/External Upload Assets, Internal/External Review, and Upload Reference Documents will be automatically started.
By default, none of the tasks are turned on. Evidently, to start configuring, you will need to tick the “Create [Internal Upload Assets] task automatically”, and there will be a menu for each. They are pretty similar. However, we will still go through the motions of each:
- Internal Upload Assets Task: creates a task for uploading assets from inside Approval Studio so only registered users can do this task. This task can be created right after project creation or when internal or external reviewers reject the mock-up. Additionally, the menu allows you to set up a responsible for this task user, due date, and comments if needed.
- External Upload Assets Task: creates a task for uploading assets for users not registered with Approval Studio. The trigger menu is the same as in the previous one. However, external users receive an email that lets them know of the task, so it is possible to set up an email subject and choose one of the languages. Additionally, to provide confidentiality, you can set a password.
- Internal Review Task: creates an asset review task for registered users of the chosen tenant. It can be automatically launched after the Internal or External upload task is completed and when the External Review Task is finished. The menu is the same as for Internal Upload, as it follows the same structure.
- External Review Task: creates an external review for non-registered users, e.g., clients, after assets are uploaded or an internal review is approved. Other than permission for the assets to be downloaded, all other settings coincide with the external upload task.
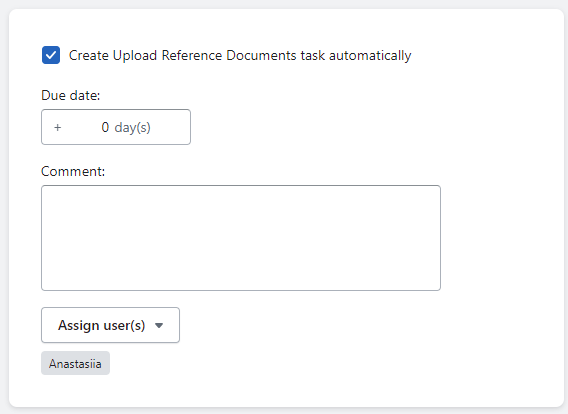
- Upload Reference Documents Task: allows internal users to upload reference documents for the project. It is created automatically after the project is done, and the only things you can set up are a due date, responsible users, or a comment.
Tags Settings and File Uploader
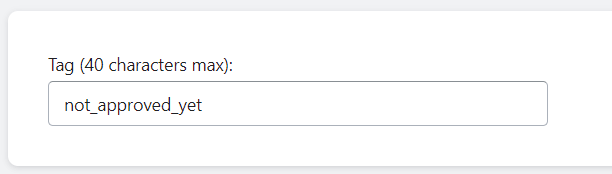
This may well be the easiest part of the settings. In this integration, tags are indicators of the project’s progress that are visible in the “Orders” menu. This lets you understand what happened to the project overnight without entering the integration menu. Again, in the spirit of the industry, they are 100% customizable! Enter anything under 40 characters that will efficiently inform you or motivate you to upload a new version after yet another rejection. Tags also follow the “if” system, so for example, in the screenshot below, we can see that when a new project is just created, it will have a tag “not_approved_yet” in the “Orders” menu.
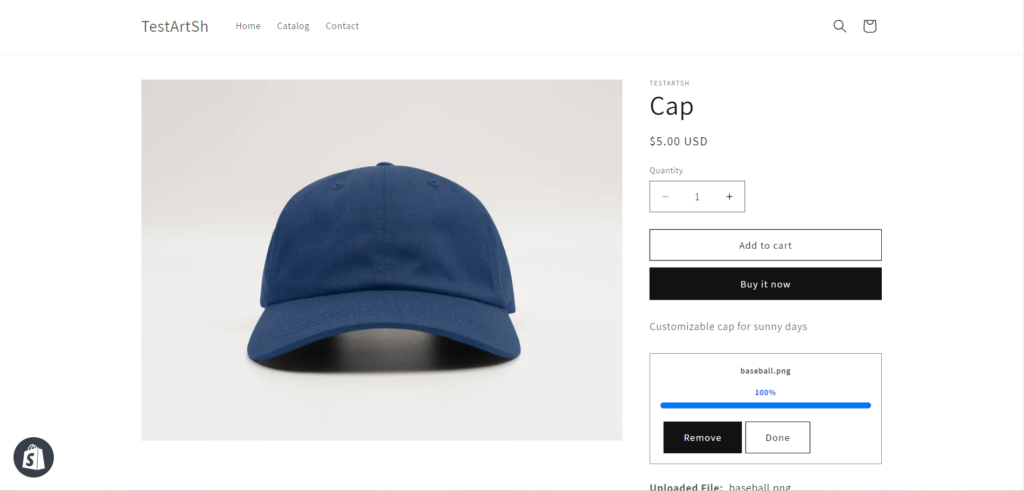
File Uploader is the last settings feature that allows your customers to upload the image they want when ordering. The customer picture will be automatically uploaded to the Approval Studio project as a reference document. You can seamlessly work with the client without manually emailing them and asking for the pictures they want.
Basic Workflow
Let’s try to make sense of all the settings here and build a workflow out of them. I have a shop that consists of two people: a designer and a manager who deals with the clients/orders. One morning, I woke up to see a new order for a cap in my orders, so I quickly got to work.
I have previously set up an Internal Review Task to launch automatically after the project creation, so I know that my designer has already received their task in the Approval Studio and is working on it. I don’t need to contact them again about a picture on my cap as I know it is already in the project, and everything is provided. Furthermore, I don’t need to stress out and check the project every hour to see if there is any progress because I have configured to be assigned as a project owner and receive all the updates.
A little later, I got a notification that the Internal Upload task was finished, and as per the settings, after the upload task was completed, a new one appeared: an internal review for me to check all the printing configs and the ability to send out an External review for the client to approve the execution of their idea.
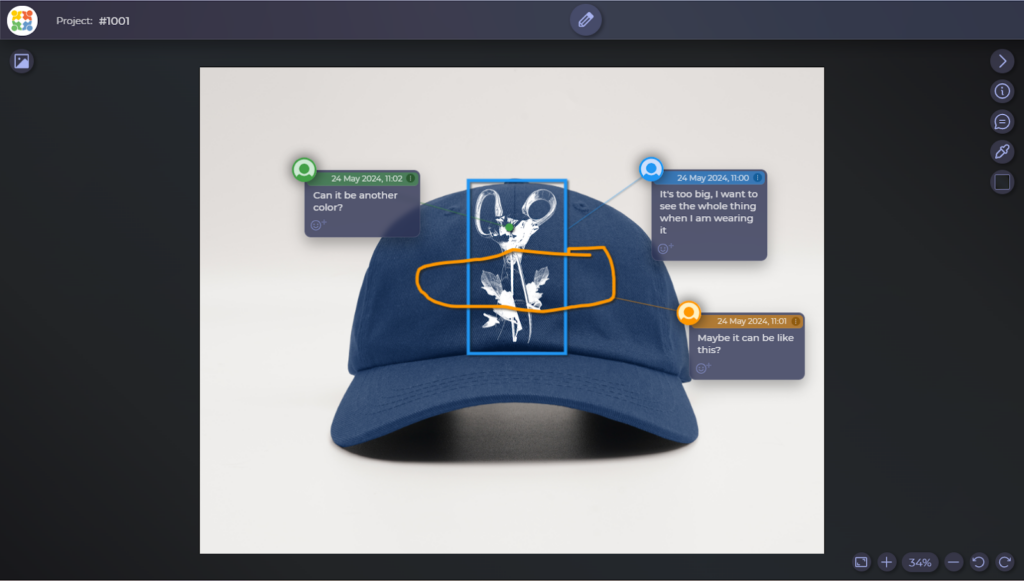
Everything was as it should have been from my side. However, the client did not appreciate the picture’s size or position and left a few comments about that. So, the External Review task was rejected, and my designer got an upload task again and got to work. At the same time, I was monitoring the progress via Approval Studio’s integration menu inside Shopify.
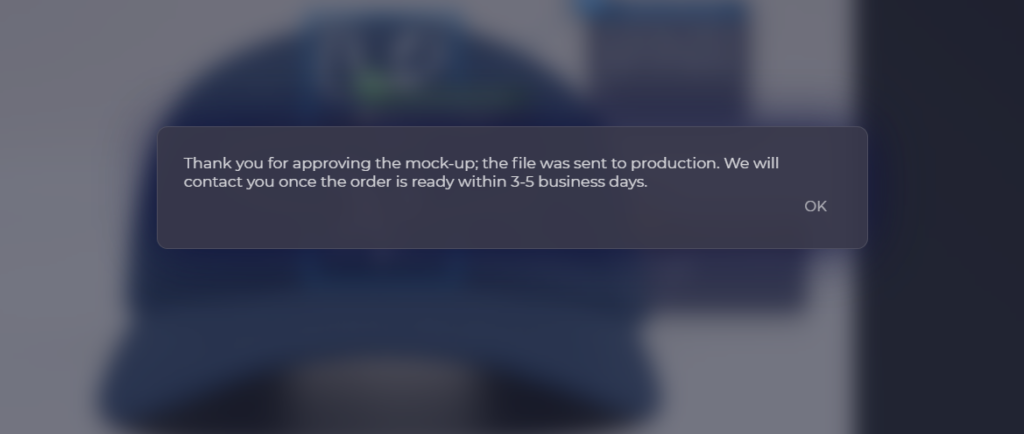
After two more cycles, both the customer and I approved the design, and the order was confirmed, printed, and shipped. Furthermore, we’ve got an amazing review tool for quick work and great customer service—what’s not to like?
Final Thoughts
The workflow described here is set in stone, and you can tailor it to your needs in any convenient or efficient way. This integration allows you to create a workflow for POD sellers that takes care of everything you do not like doing, especially the lengthy approval process that relies solely on the customer’s ability to explain things without visual representation. However, with Approval Studio’s simple and intuitive interface, your clients can express their feedback easily, using shapes and colours that make them excited to play around with and you relieved when reading clear feedback. So, if you want your workflow seamless and clients satisfied, try Approval Studio!
