Approval Studio Zapier Integration Guide
![]()

2023, © Approval Studio, v. 3.00
Please find the PDF version Approval Studio Zapier Integration Guide here.
Introduction to Zapier integration
What is Zapier
Zapier is an online tool that connects various applications with each other via their APIs. It lets users automate their work by creating custom workflow actions and automated scenarios between different applications if these applications are integrated with Zapier. You can learn more about Zapier from their website.
Approval Studio is also integrated into Zapier being available at the Zapier market and allows adding automation steps to the Approval Studio application via API to streamline companies processes and business workflows. If you are new to Approval Studio you can always see more on our website.
Possible scenarios
Zapier has more than 3000 applications integrated, so the scenarios and workflow combinations are close to infinite. For example, Zap can automatically save incoming email attachments to a Google drive folder, or send a notification to Slack when an important email arrives, etc.
This document describes basic scenarios and Zap configurations, applicable to Approval Studio integration. Change project status and details when review tasks are completed, create new upload or other tasks when new projects are created, request new design upload if corrections are required – all these can be automated using Approval Studio integration with Zapier and most obvious scenarios of Zaps’ configuration will be covered in the Sample workflow configuration section of this document.
Workflow building principles
Every workflow provided by Zapier is called a Zap. Each Zap must include one trigger – the event that starts the Zap, and an action or chain of actions that are executed once the Zap is triggered. This principle stays the same for any application integrated with Zapier.
In case with Approval Studio integration we recommend keeping in mind the following logical blueprint when creating any new Zap for Approval Studio: Trigger – > Pull information – > Filter – > Resulting action.
Trigger is the first step of the Zap. Here we tell the Zap what event we are listening to in order to proceed. There can be only one trigger per Zap.
Once the Zap is triggered, we need to make sure that the catched event is the one Zap needs to react to. One way to do this is to configure the event trigger itself by selecting the event type and/or preconfigured template from the list. Another way, if we need more information to filter out the event, is to have Zap send additional information request(s) to Approval Studio and and get more details about the catched event. Both, the information supplied by the trigger and the information received by additional requests can later be used to filter all incoming events of the selected nature by different criteria, aka the task/project owner, number of assets, status etc.
As soon as we have all the information about the event, we can tell the Zap if this is the event we were waiting for or not and filter only those events that we expect. In this stage we map the information received from Approval Studio with our expectations. In case some criteria do not match, the Zap will not continue.
Resulting action is what we need from the configured Zap to do if all the criteria of the received event match our expectations. For example, if the design review task was rejected in a project with a specified project owner, Zap should automatically create another upload task for the designer and send a message to the project owner.
NOTE: We recommend creating a dedicated admin user in Approval Studio to configure Zaps in order to avoid confusion in Project History records.
Approval Studio integration with Zapier
Approval Studio integration with Zapier lets you interact with the Approval Studio API and thus react to a number of events that take place in your Approval Studio account and perform one or several actions, that we provide and which Zapier will initiate automatically on your behalf in Approval Studio.
Basic terms and definitions
In order to interact with Approval Studio API via Zapier you need to understand basic entities of the Approval Studio application like Project, Asset, Review Tool, Annotation, Reference Document, Internal Task (and their types), External Task and Project Template. If you are already familiar with them, you can jump directly to the next section of the document. If not, here is a brief description of them.
Project is the main entity of Approval Studio. It’s the logical representation of some piece of work to be done. Project has multiple customizable description attributes and is the place where Assets, Reference Documents and other related entities are linked/uploaded to.
Asset is the piece of artwork (image file) that needs to be created, reviewed and approved in the Review Tool before the project is considered to be completed. Assets are uploaded to projects by the project owner, or by means of completing internal Upload Asset Task assigned to another Approval Studio user.
Review Tool is the part of Approval Studio tool that helps users review Assets (approve or reject them), leave annotations on the Asset canvas to identify parts of the image where changes need to be made.
Annotation is a special marking on Asset canvas with description.
Reference document is the project-related supplementary documentation. Reference documents do not need to be reviewed, their only purpose is to provide additional information about the project. Reference documents are uploaded to projects by the project owner, or by means of completing internal Upload Reference Document task assigned to another Approval Studio user.
Internal Task is the task assigned to a user created in Approval Studio. Internal tasks are used to distribute some project related activities within a team. There are several types of internal tasks:
- Upload Asset
- Review Asset
- Review All Assets
- Upload New Asset Version
- Upload Reference Document
External Task is a review asset task assigned to a person that does not have and account in Approval Studio.
Project Template is a unique value that you assign to a Project when creating it. It helps to filter out projects that need to be automated vs those that do not.
Unique IDs, keys and values
Every entity in Approval Studio has its unique ID (UID). The UID record is what you will work with when creating a Zap. For instance, the project UID record looks like this:
project_uid: FF81095F4EC0473B9767AA4A067606C4
The list of UID records that you may work with while configuring Zaps is the following:
| Name | API UID record key |
|---|---|
| Company UID | client_uid |
| Project UID | project_uid |
| Project template UID | project_template_uid |
| Asset UID | asset_uid |
| Reference document UID | refdoc_uid |
| Task UID | task_uid |
| Annotation UID | annotation_uid |
Triggers and actions in Zapier integration
As was mentioned before, every Zap must have a trigger (the event that starts the automatic process) and one or more actions that are automatically performed to reach the desired behavior.
Triggers
Trigger is the very first item of any Zap. Approval Studio integration provides the Zapier user with a variety of events that Zapier can react to. The trigger in its turn returns relevant information about itself that can be later used to configure Zap actions that will follow. Trigger can also filter the incoming events by the event type of self and the template if supplied.
Trigger configuration
All Zap triggers, provided by Approval Studio, are configured following the simple four step scenario.
Choose app & event
First thing to do when creating a new Zap, is to select the application from the Zapier repository for the trigger. Search by Approval Studio name in the provided list of Zapier integrations and select Approval Studio.
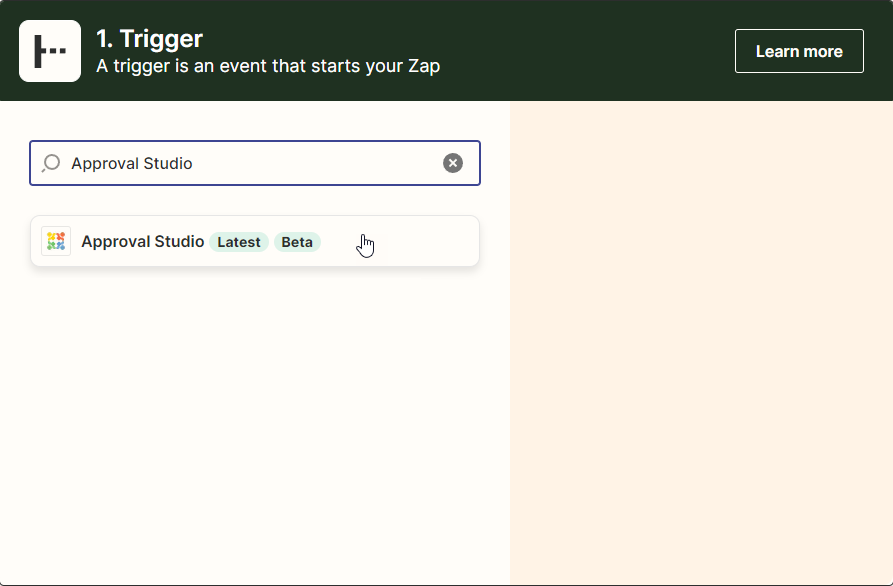
Once Approval Studio is selected as the desired application for the Zap trigger, choose one of the provided Events from the list and click Continue. Doing this you tell your Zap what event it will listen to in Approval Studio to happen in order to initiate the further automatic actions.
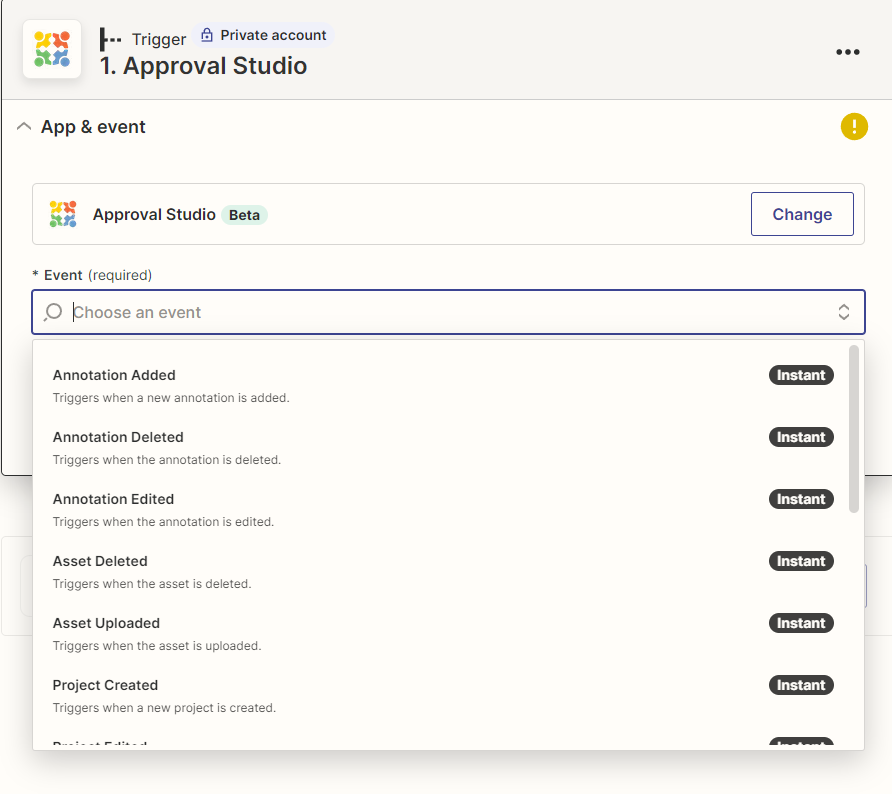
List of available trigger events
Approval Studio integration with Zapier provides a number of events it can react to. Below is the table with all the event options available.
| Trigger Name | Explanation | Returned UID record(s) |
|---|---|---|
| New project is created | Fires when a new project is created. | client_id, project_uid, project_template_uid |
| Project edited | Fires when a project’s attribute is changed, like name, description, due date etc. | client_id, project_uid, project_template_uid |
| Project state is changed | Fires when project state changes. | client_id, project_uid, project_template_uid |
| Asset uploaded | Fires when an asset or a new version of an existing asset is uploaded. | client_id, project_uid, asset_uid, project_template_uid |
| Asset deleted | Fires when an asset is deleted. | client_id, project_uid, asset_uid, project_template_uid |
| Reference document uploaded | A new reference document is uploaded. | client_id, project_uid, refdoc_uid, project_template_uid |
| Reference document deleted | An existing reference document is deleted. | client_id, project_uid, refdoc_uid, project_template_uid |
| Annotation added | An annotation to an asset is created. | client_id, project_uid, asset_uid, annotation_uid, project_template_uid |
| Annotation edited | An annotation is edited. | client_id, project_uid, asset_uid, annotation_uid, project_template_uid |
| Annotation deleted | An annotation is deleted. | client_id, project_uid, asset_uid, annotation_uid, project_template_uid |
| Task is created | A new task of any type is created. | client_id, task_uid,project_uid, project_template_uid, asset_uid |
| Task is completed | A task is marked as completed. | client_id, task_uid,project_uid, project_template_uid, asset_uid |
| Task is deleted | A task is deleted. | client_id, task_uid,project_uid, project_template_uid, asset_uid |
| Task is approved | An asset review task marked as approved. | client_id, task_uid,project_uid, project_template_uid, asset_uid |
| Task is rejected | An asset review task marked as rejected. | client_id, task_uid,project_uid, project_template_uid, asset_uid |
Choose account
Next step is to specify what Approval Studio admin account will be used by the trigger to listen to the events. First time Zapier will ask to provide the login and password for the Approval Studio account.

Later on you can just select the account from the list of accounts that Zapier will store.
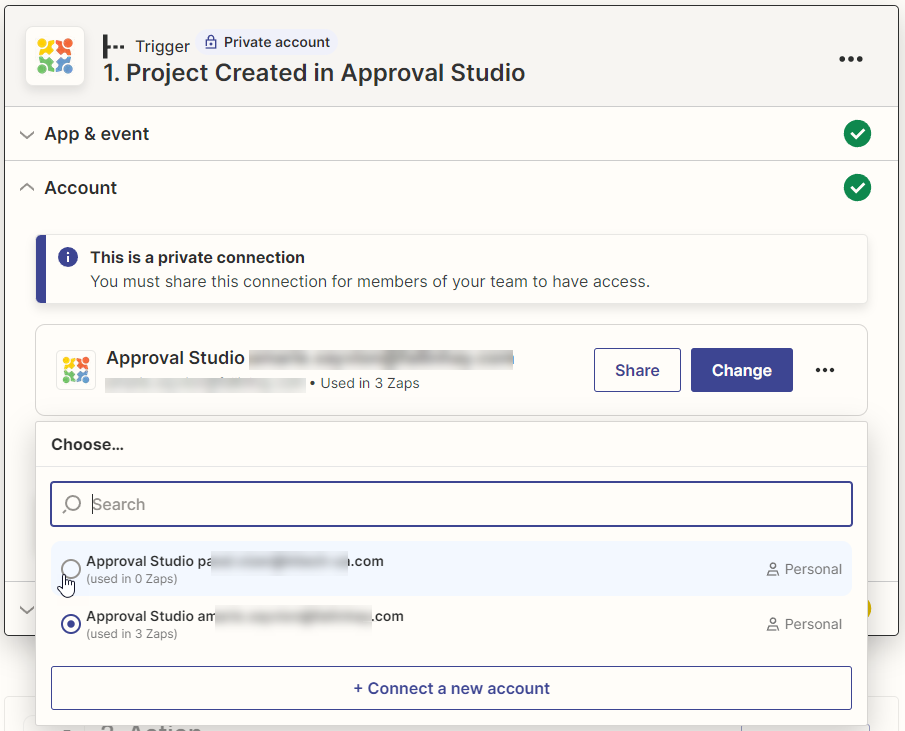
We highly recommend creating a dedicated admin account in Approval Studio to make it easier to track Zap initiated activities in Project timeline and avoid confusion.
Once the account is selected, continue to the next step.
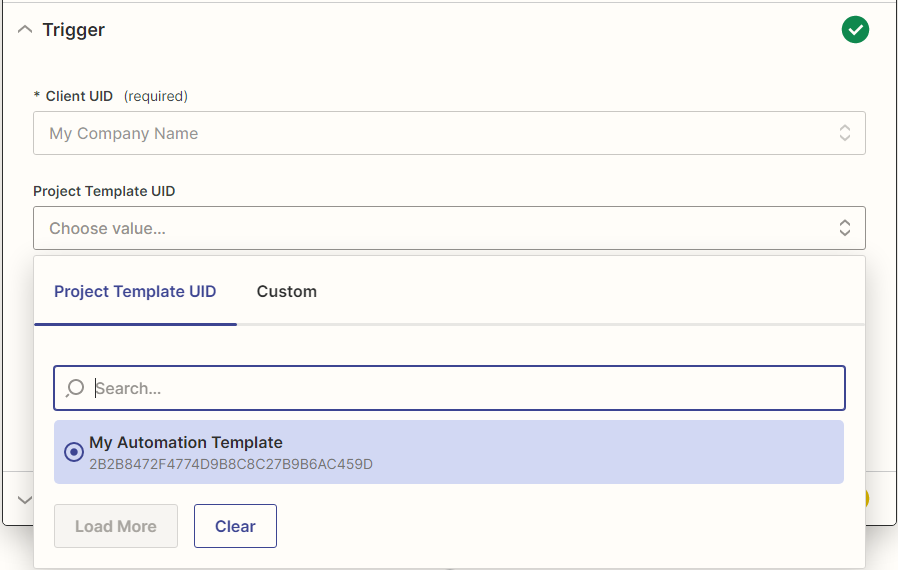
Set up trigger
The set up trigger step has one mandatory field that you need to select – Client and optional fields like Project Tempalate UID and Task Type. The optional fields are used to filter the catched event, previously selected in the App&Event step. Zap will only proceed if the catched event has parameters, set in the optional filds.
Client is your company name, you will only have one option there in most cases.
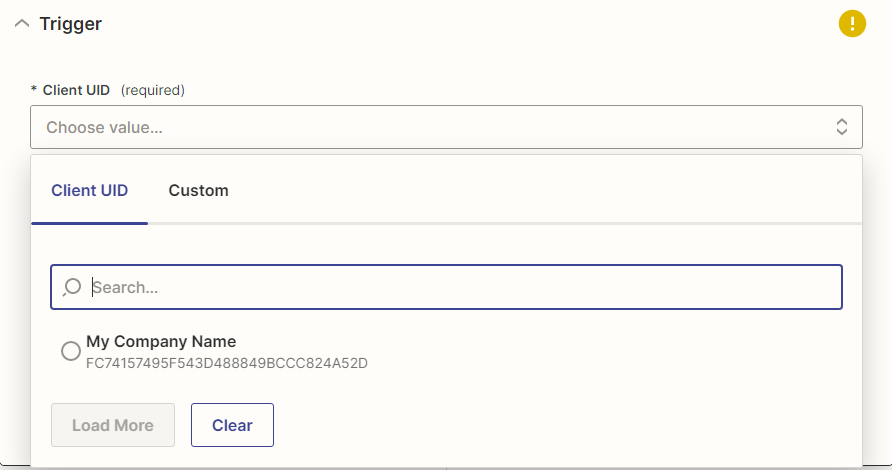
If necessary, one may configure the available optional fields to filter the incoming events. There are currently up to two optional fields available in every trigger. Project Template UID is avalable on every trigger. The second optional field – Task Type – is available only on task related triggers.
Once the optional fields are configured, continue to the final trigger configuration step – Test Trigger.
Test trigger
This is the last trigger configuration step. Testing the trigger successfully will ensure that you have configured it correctly. In order to test the trigger you first need to make the trigger activity manually in the Approval Studio application and then click on Test trigger.
For example, if you have selected “New project is created” as Event Type in the first trigger configuration step, you will first need to create a Project manually in Approval Studio and then click on the Test trigger button.
Zap will check if the selected trigger was fired and return you information about the event that will later be used to configure Zap actions.
Approval Studio integration with Zapier also provides dummy events that will load by default. One may also build Zaps using these default events.
If you do not see the event in the list, click Load More in the list of catched events.
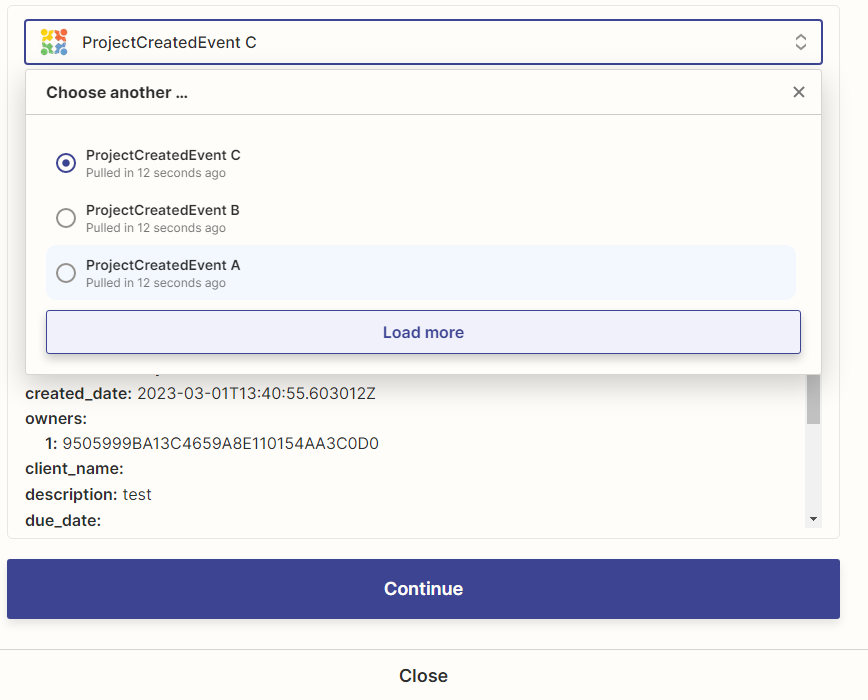
Once the event was catched, click Continue to proceed to Zap action configuration.
Actions
Approval Studio integration with Zapier provides a range of actions that can be performed automatically in Approval Studio through Zapier. The provided actions can be logically divided into two groups - informative actions and resulting actions.
Informative actions (under SEARCH group in action selector) are those that when performed return more information about the selected entity of Approval Studio by its UID. No changes are done to any Approval Studio entity as a result of performing informative action.
Resulting actions (under CREATE group in action selector) are those that when performed make changes to Approval Studio entities and return information about the performed changes.
Action configuration
Alike with the triggers, every Zap action has four configuration steps that need to be completed.
Choose app & event
Once the trigger is created, click on the “+” below the trigger and choose the Approval Studio application from the Zapier repository. If you do not see the Approval Studio application in the list, you can always search by its name.
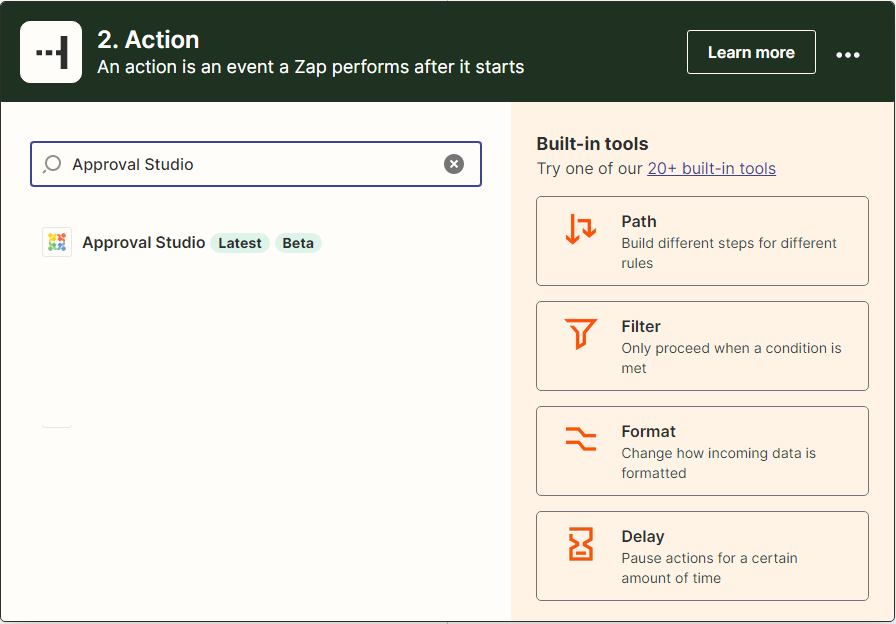
Next, in the event selector, choose the action that you want your Zap to perform automatically in Approval Studio once the configured trigger is fired. Approval Studio provides a range of actions that can be performed automatically.
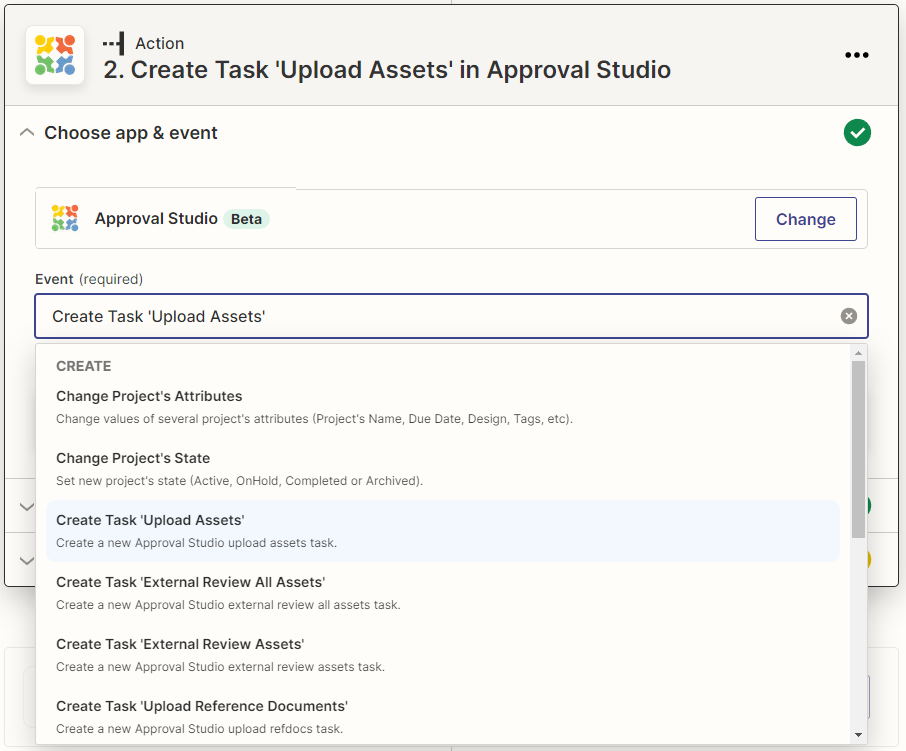
For demonstration purposes we will select the Create Task ‘Upload Assets’ event in this section.
List of available actions
| Action name | Description | Required UIDs |
|---|---|---|
| Change Project’s Attributes | Changes project attributes like Project name, description, due date etc. in Approval Studio. | project_uid |
| Change Project’s State | Changes Project state from/to Active, On Hold, Completed, Archived. | project_uid |
| Create Task “Upload Assets” | Creates internal Upload Assets task for a selected Approval Studio user in a given project | project_uid |
| Create Task “External Review All Assets” | Creates external Review All Assets task for an external user (by email) to review all Assets in a selected Project. Project should have some assets uploaded to work correctly. | project_uid |
| Create Task “External Review Assets” | Creates external Review Asset(s) task for an external user (by email) to review one or several selected assets. | project_uid, asset_uid |
| Create Task “Upload Reference Documents” | Creates internal Upload Reference Documents task for a selected Approval Studio user in a given project | project_uid |
| Create Task “Review All Assets” | Creates internal Review All Assets task for a selected Approval Studio user in a given project. Project should have some assets uploaded to work correctly. | project_uid |
| Create Task “Review Assets” | Creates external Review Asset(s) task for a selected Approval Studio user in a given project to review one or several assets | project_uid, asset_uid |
| Get Project Info | Retrieves information about the project by its UID. No changes are made to Approval Studio. | project_uid |
| Get Task Info | Retrieves information about the task by its UID. No changes are made to Approval Studio. | task_uid |
| Pick Project Template | Retrieves information about the available Project templates. Used to filter out Zaps by Project template. | client_id |
| Pick Task Type | Retrieves information about the available task types. Used to filter out Zaps by task type. | client_id |
| Add URL as RefDoc | Adds specified URL as reference document to the project. | project_uid, url |
| Upload RefDoc by URL | Uploads reference document to the project from the specified URL. | project_uid, url |
| Upload Asset by URL | Uploads asset to the project from the specified URL. | project_uid, url |
| Create New Project | Creates new project in the specified tenant. Project name and project owner need to be provided. | client_id, project_name, project_owner |
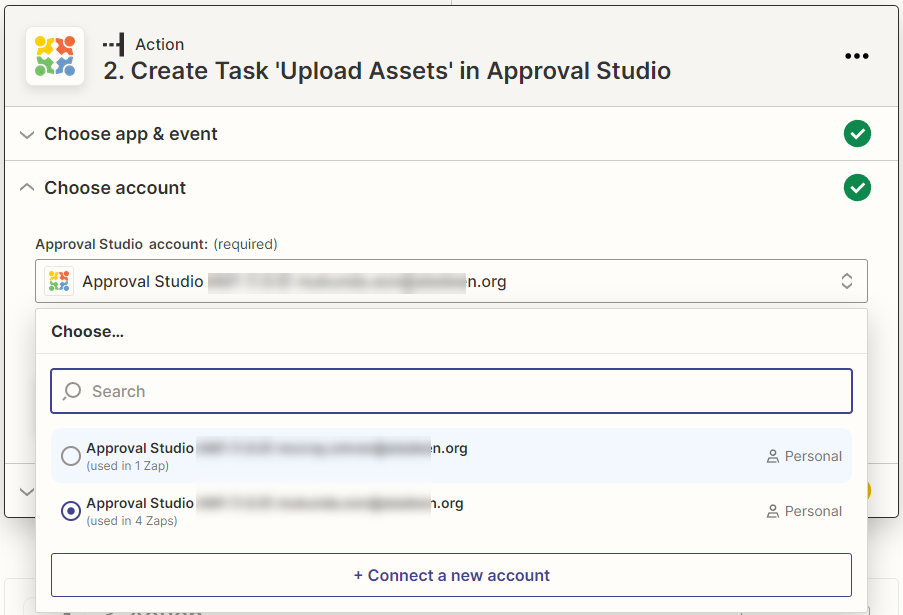
Choose account
This configuration step is similar to the one from trigger configuration, here you need to select the Approval Studio admin account that will automatically perform the action that we are configuring.
If the account is the same as was selected in trigger configuration, Zap will let you select it from the list, otherwise you can add another account and authenticate a new account via providing username and password.
Set up action
In this step we configure what we want Zap action to send over to the Approval Studio API in order to perform the selected action.
In this step, depending on the action that you have chosen, you will find drop-down menus and other fields you need to fill in by choosing from the provided list, manually or by mapping fields received from Zap trigger or previously configured action. Some of them are required, while others are optional.
In most cases Zap actions, created for Approval Studio will use mapping principle in its configuration.
In our example with the selected Upload Assets task we will need to map the required Project UID field with one we’ve previously received from the “New project is created” trigger.
To do this, click on the Project UID field in action set up, switch to the “Custom” tab, then choose “Show All options” and finally select Project UID supplied by the trigger.
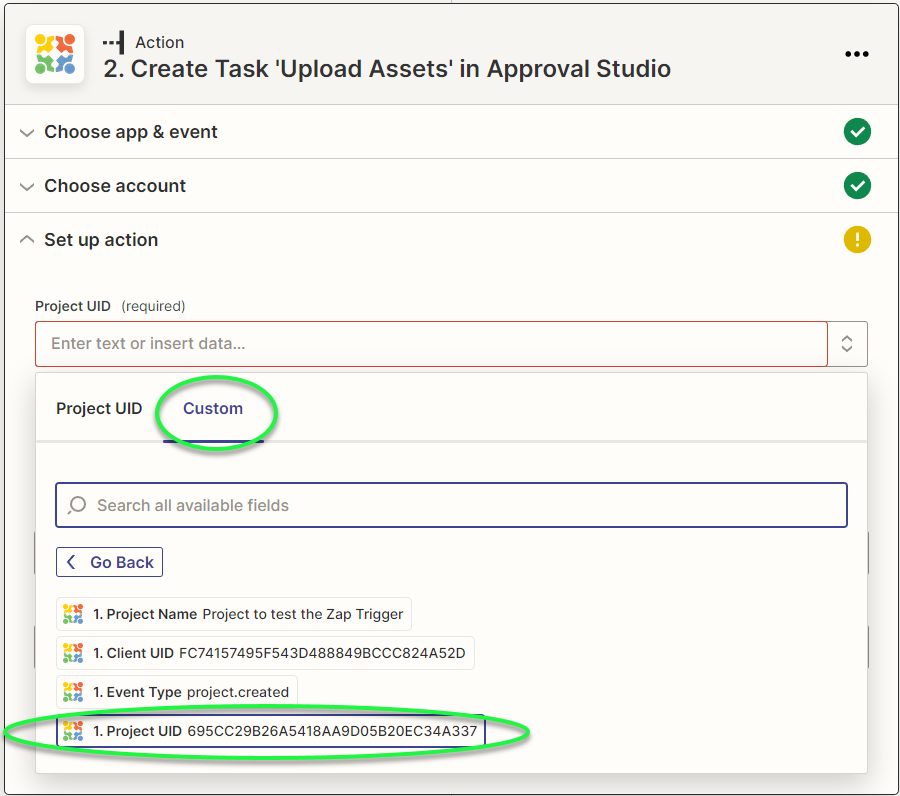
Now we have mapped the Project UID and by this we are sure that the Upload Assets task will be created for the project that we received from the “New project is created” trigger.
If we did not map the Project UID from the trigger, but selected a Project from the already existing list, the task would have been created for the selected existing project every time, whatever project is created, which is not correct.
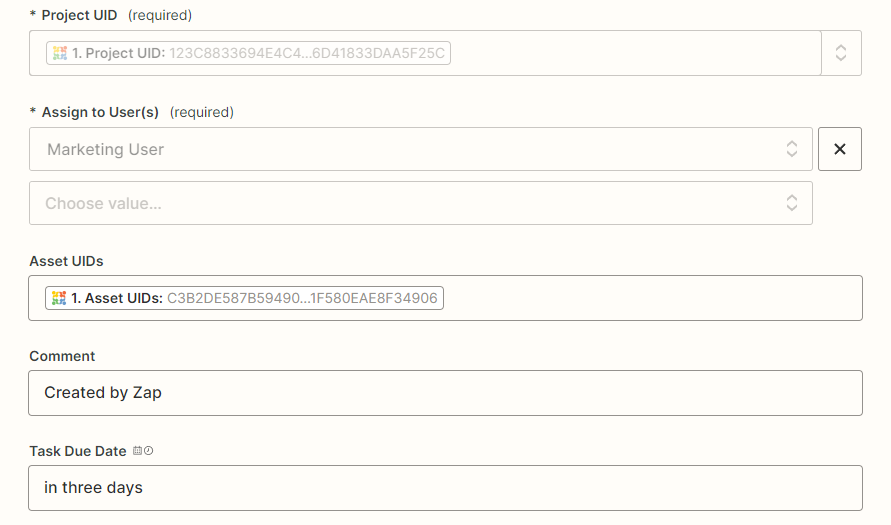
Next required field in this action is “Assign to User(s)”. Unlike with the Project UID field we do not need to map it with previous triggers/actions, since we have the same user that should perform the generated task for all the created projects.
To do this, click on the “Assign to User(s)”, wait for the list of users to load and select one from the list who will be responsible for all the generated Upload Assets tasks. If there are more users to be assigned to the task, you can select them one by one.
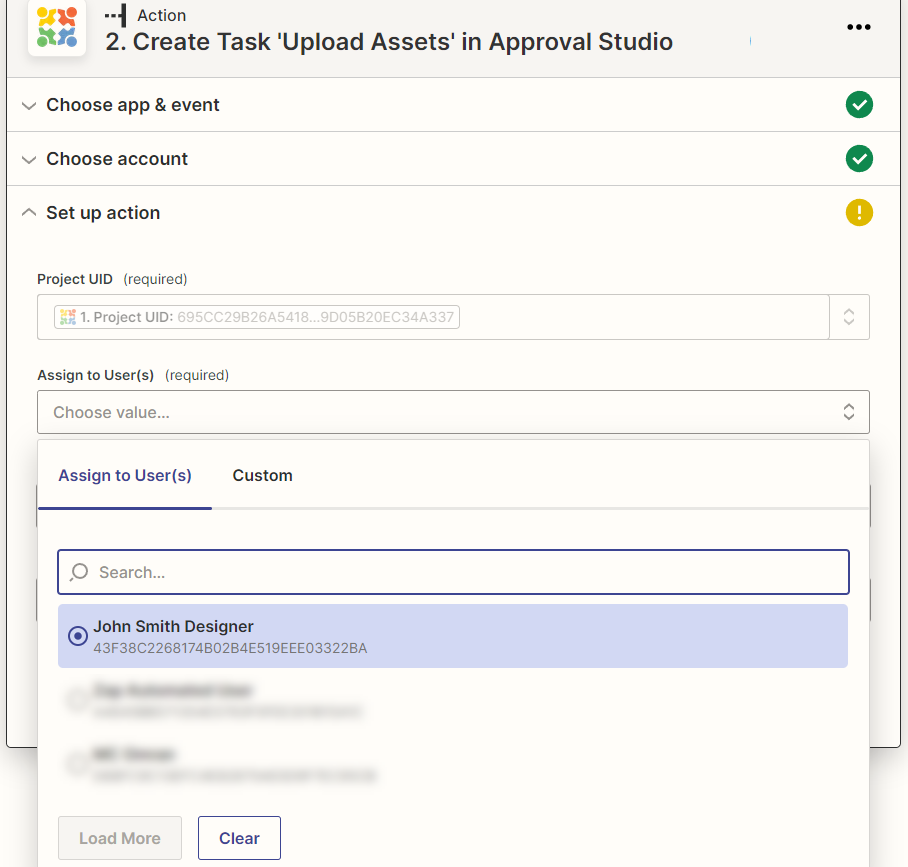
Once all the required fields are filled in, you may configure the optional fields, for our example action “Create Task ‘Upload Assets’” we have Comment and Due Date fields, and continue to the Test action step of Zap action configuration.
Test action
Once you switch to the Test action step, Zapier will show you all the previously configured parameters that will be sent as a test request to the Approval Studio API.
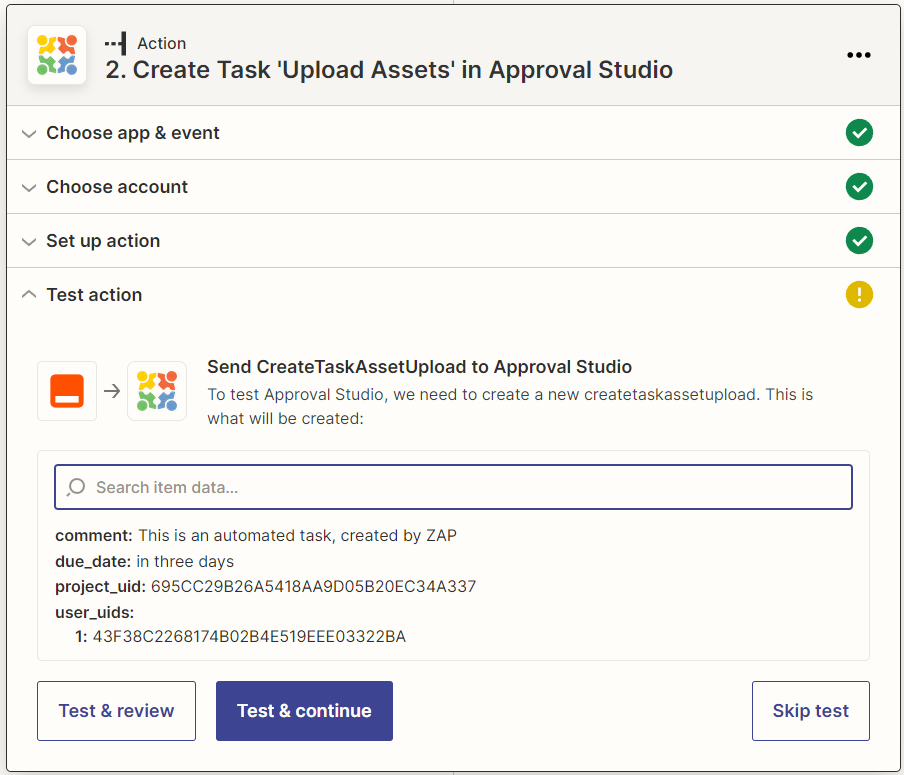
Click Test & Continue to send the test request, in our case this will create the Upload Asset task for the selected user and return information about the created task.
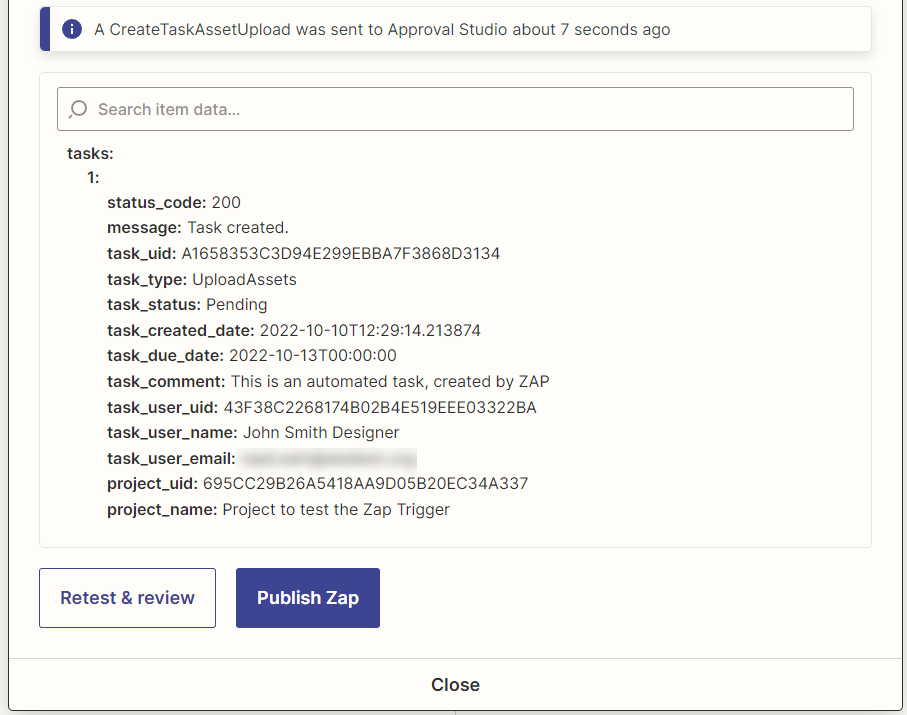
Now it’s time to publish your first Zap. While it remains active, Zap will create an Upload Assets task for the selected user whenever any project is created.
Sample workflow configuration
In this section we will configure a simple project workflow in Approval Studio that will be automated via four Zaps. The workflow diagram will look like on the mockup below.
Workflow diagram
Project Templates to organize automated flows
We can have multiple workflows to leverage our company’s business process, so in order to route our flow into the correct pipeline, we suggest using Project Templates when creating a Project and then filtering the Zap event triggers by a selected Project Template. We have created and will use the “My sample workflow” Project Template in our Zaps.
Note: Project Template can be assigned to a new Project in Approval Studio when it’s created and cannot be changed afterwards. If you do not have Project Templates available for your Approval Studio account, please contact our support via online chat in the application.
Breaking workflow into Zaps
To implement this sample workflow we will need to break down our workflow into separate processes and create a separate Zap for each process. In our case, we need to break down the workflow into four Zaps.
- Create Project – > Upload Assets Zap will react to projects, created in Approval Studio and create an internal Upload Assets task for a selected Approval Studio user.
- Upload Assets – > Review Assets Zap will react to the Upload Assets task to finish and will create Review Assets task for a selected Approval Studio user to review the uploaded assets.
- Review Rejected – > Upload Assets Zap will be triggered if the Asset was rejected during Review Assets task and will create a new Upload Assets task for a selected Approval Studio user and thus will loop our workflow like shown on the diagram.
- Review Approved – > Mark Project Complete Zap will be triggered if the Asset was approved during Review Assets task and will mark the project complete in one of the selected project fields.
Keeping in mind that you may have several workflows in the future, we will filter every Zap by Project Template. Now it’s time to create our Zaps.
Zap 1: Create Project => Upload Assets
This Zap will wait until a new Project is created in Approval Studio application, check if the created Project has the correct Project Template assigned during its creation and if the Project Template matches the one we need, proceed with automatically creating and assigning internal Upload Assets task to a selected Approval Studio user. To address the described behavior, we need to create a two-step Zap.
Create trigger “Project Created”
This trigger’s configuration steps are the same as was described earlier in this document. So fill in the trigger details following the common configuration pattern:
- Select the Approval Studio application from the Zapier repository and from the event list choose “Project Created” event.
- Choose Approval Studio admin account on which behalf the trigger will listen to the Approval Studio event.
- Select your
Client UIDthat corresponds to your company name and then, in the Project Template UID optional filed, choose the “My sample workflow”. This will allow our Zap to do the following actions only if the Project Template of the created project is “My sample workflow”. - Test the trigger by creating a project in Approval Studio application and clicking Test Trigger in Zap.
Create action “Create Task ‘Upload Assets’”
The second and last step is to create the Upload Assets task in Approval Studio for the project that was created:
- Select the Approval Studio application from the Zapier repository and choose Create Task ‘Upload Assets’ from the Event list
- Choose the Approval Studio admin account on which behalf the action will be performed
- Map the
Project UIDwith one received from the trigger – go to Custom, choose trigger and selectProject UIDfrom there. Then select the Approval Studio user who should perform the Upload Assets task. Fill in optional fields if necessary. - Test the action
As a result of test, Zap will create the Upload Assets task for the selected user.
Now its time to Publish the Zap. Once published, Zap will automatically create Upload Assets task for the selected user whenever a Project with Project Template “My sample workflow” is created in Approval Studio.
Zap 2: Upload Assets => Review Assets
This Zap will wait until any task is completed in Approval Studio, check if the completed task type is Upload Assets task and has files uploaded, check if the Project Template is “My sample workflow” and only then will automatically create an internal Review Assets task for the Approval Studio user, responsible for reviewing assets.
Create trigger “Task Сompleted”
This trigger will initiate whenever someone completes a task in the Approval Studio application but will only proceed to further actions if the parameters in the catched event match those configured in the trigger’s optional parameters like Project Template and Task Type.
The trigger configuration steps are the following:
- Select the Approval Studio application from the Zapier repository and choose Task Completed Event.
- Choose Approval Studio admin account on which behalf the trigger will listen to the Approval Studio event.
- Select your
Client UIDthat corresponds to your company name. Then, in the Project Template UID optional filed, choose the “My sample workflow”. Finally, in the Task Type optional field, choose Upload Assets. This will allow our Zap to do the following actions only if the Project Template of the completed task is “My sample workflow” and the task type is Upload Assets. - Test the trigger - upload file via the Upload Asset task, completing the task in Approval Studio application, then switch to Zap and click Test Trigger.
Create action “Filter by Zapier”
"Filter by Zapier" is a generic action provided by Zapier. It allows to fire Zap actions only if certain criteria are met. In our scenario, it will allow our Zap to continue only if our completed Upload Assets task has any files in it.
The configuration steps would be the following:
- Select Filter by Zapier from the Zapier repository.
- In the Filter setup & testing section, choose
Number of Assetsparameter from Task Completed trigger, select condition (Number) Greater than and put zero as value to check against.
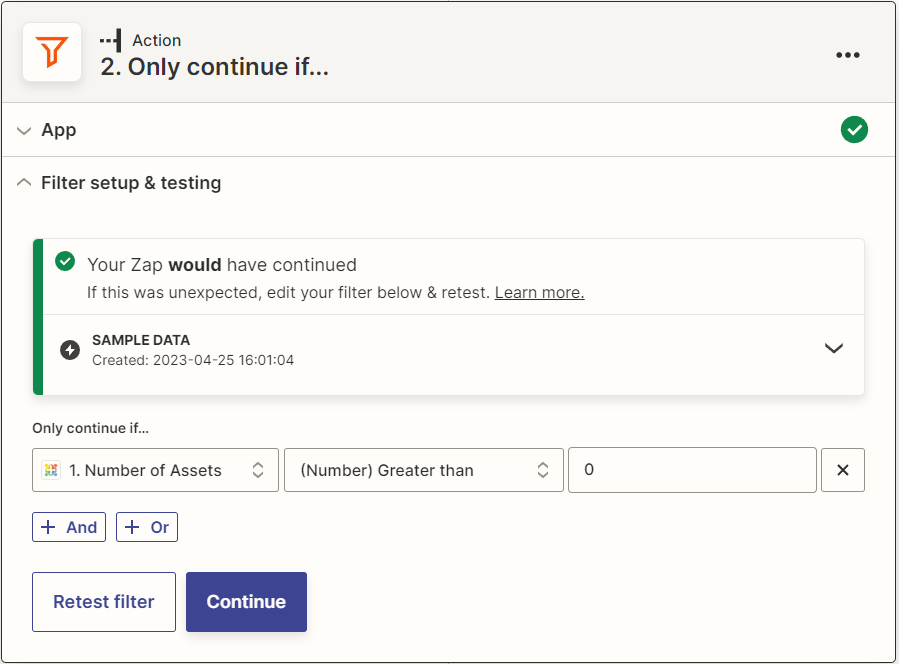
- Test the filter.
Create action “Create Task ‘Review Assets’”
If the event from Approval Studio passes all the checks we have made, we can now proceed to creating the Review Assets task for the assets that were uploaded via our Upload Assets task.
- Select the Approval Studio application from the Zapier repository and choose Create Task ‘Review Assets’ from the Event list
- Choose the Approval Studio admin account on which behalf the action will be performed.
- Map the
Project UIDandAsset UIDswith those received from Task Completed trigger - go to Custom, choose Task Completed and selectProject UIDfrom there then do the same forAsset UIDs. Select the Approval Studio user who should perform the Review Assets task. Fill in optional fields if necessary.
- Test the action and Publish the Zap
Now whenever someone completes the Upload Assets task for Project with “My sample workflow” Project Template, Zap will automatically create a Review Assets task for the selected Approval Studio user(s).
Zap 3: Review Rejected – > Upload Assets
This Zap will wait until any Review Assets task is rejected, check if the rejected asset belongs to a task with Project Template “My sample workflow” assigned to it, and only then create an Upload Assets task in Approval Studio and assign it to a selected Approval Studio user.
Create trigger “Task rejected”
This trigger will fire whenever someone rejects an Asset while doing a Review Asset task in the Approval Studio application.
The configuration steps are the following:
- Select the Approval Studio application from the Zapier repository and choose Task Rejected event for the trigger to react to.
- Choose Approval Studio admin account on which behalf the trigger will listen to the Approval Studio event.
- Select your
Client UIDthat corresponds to your company name. Then, in the Project Template UID optional filed, choose the “My sample workflow”. Finally, in the Task Type optional field, choose Review Assets. This will allow our Zap to do the following actions only if the Project Template of the rejected review task is “My sample workflow” and the task type is Review Assets. - Test the trigger - launch a Review Assets task in Approval Studio, reject the asset in Review Tool, then switch to Zap and click Test Trigger.
Create action “Create Task ‘Upload Assets’”
If all the conditions set in the trigger optional fields match, we create an Upload Assets task in Approval Studio for a selected user.
- Select the Approval Studio application from the Zapier repository and choose Create Task ‘Upload Assets’ from the Event list
- Choose the Approval Studio admin account on which behalf the action will be performed
- Map the
Project UIDwith one received from the trigger – go to Custom, choose trigger and selectProject UIDfrom there. Then select the Approval Studio user who should perform the Upload Assets task. Fill in optional fields if necessary. - Test the action
Now whenever the Review Task is rejected and the Project has the expected Project Template assigned, Zap will automatically generate an Upload Assets task for the selected User in Approval Studio.
Zap 4: Review Approved => Mark Project Complete
This Zap will wait until any Review Assets task is approved, check if the approved asset belongs to a task with Project “My sample workflow” assigned to it, and only then mark Project complete by changing the selected Project attributes.
Create trigger “Task approved”
This trigger will fire whenever someone approves an Asset while doing a Review Asset task in the Approval Studio application.
The configuration steps are the following:
- Select the Approval Studio application from the Zapier repository and choose Task Rejected event for the trigger to react to.
- Choose Approval Studio admin account on which behalf the trigger will listen to the Approval Studio event.
- Select your
Client UIDthat corresponds to your company name. Then, in the Project Template UID optional filed, choose the “My sample workflow”. Finally, in the Task Type optional field, choose Review Assets. This will allow our Zap to do the following actions only if the Project Template of the approved review task is “My sample workflow” and the task type is Review Assets. - Test the trigger – launch a Review Assets task in Approval Studio, approve the asset in Review Tool, then switch to Zap and click Test Trigger.
Create action “Change Project’s Attributes”
Now that the asset is approved, we can mark the Project as completed in some way. One of the ways is to change its attributes. In this case we will append some text like “Asset was approved(ZAP)” to the project name, so that the Project owner notices it on the Approval Studio dashboard.
- Select the Approval Studio application from the Zapier repository and choose Change Project’s Attributes from the Event list.
- Choose the Approval Studio admin account on which behalf the action will be performed.
- Map the
Project UIDfrom the Task Rejected trigger - click Custom, select Task Rejected from the list and chooseProject UIDfrom the list of available values. Then choose Append Value under “Project Name: Choose Action” section and input the text that you want to be appended to theProject Namein “Project Name: Set Value” field. Make any other changes to project attributes available in this action. - Test the action and publish Zap.
Now whenever the Asset is approved, Project name and/or other project attributes will be automatically changed accordingly.
Conclusion and disclaimer
Approval Studio integration with Zapier is a powerful tool to automate your business process in Approval Studio. With that Approval Studio has no control over Zapier services, so cannot guarantee that all Zaps will or will not be executed on time and in a timely manner. In case you have any questions or need help with configuration, please reach out to us via online chat in Approval Studio.